Recent Posts
Phone & Address Info
Looking To Build Your Own Fence?
There are many different ways to look at when building a fence that lasts and a boat load of things to consider when building. However, if you aren't familiar with building a fence that lasts, it can seem overwhelming. You need to survey the land prior to getting started, set the fence posts, select the right type of cement for your soil, decide on whether or not to have a gate or not, as well as think about staining the fence once it's finished. All that is not including any hills or slopes that may be involved, or even selecting where to build.
But not to worry; here is a mini-guide that will give you all the tips to building a fence that lasts and will make your entire fence building project as smooth as possible. Simply follow the following 7 steps and you'll be enjoying your brand new fence in no time.
-
Tip #1: Importance of Surveying Land Before Building
Before you do anything that has to do with building a fence, you must survey your land. This is one of the most important steps in building a fence. Imagine that you bought all your fence posts and panels, marked out where your fence posts are going to go and started to dig the postholes. The first 5 go according to plan. But then you get to fence post #6 and realize that there are all types of water pipes and underground wires that you just cut into. This is a huge setback.
This is why it is so important to survey your land before building your fence. It will make sure that you don't run into any underground 'unknowns' and help you to make sure that you can build your fence in a straight line.
-
Tip #2: Properly Setting Your Fence Posts
Once you have surveyed your land and know where you can safely build your fence, it's time to properly set your fence posts. To do so, you must start by setting your line. To do this, simply put a stake in the ground where you want your corner posts to go. Once this is done, take a string and run it around the two posts. You can then mark out where you want to put your fence posts in regular intervals within the space.
The length between your fence posts will vary depending upon the type of fence you're installing and whether or not you are using preset panels, but you can easily mark where your fence posts will go by using some marking paint to mark the locations.
-
Tip #3: Use Dry or Wet Cement for the Fence Posts
There is a common misconception that you must use cement to set your fence posts correctly. This all depends upon the type of soil you are trying to build a fence in. Cement is a great fence post setter when you are building your fence in looser types of dirt and soil. However, when it comes to harder, clay like types of soil, using dry cement will work better. Not only will the dry option work better in this terrain, it will also drain a lot easier so that you don't have any pulling of water which can lead to wood rot and mold.
-
Tip #4: Selecting a Place to Build
Selecting a place to build your fence all comes down to your yard, what you are building your fence for and any city ordinances that you must abide by. Many cities have rules about how close to the sidewalk you are able to build your fence. This is going to greatly influence you when you are selecting where to build your fence. Be sure to check with any city ordinances prior to getting started so you don't have to move your fence.
-
Tip #5: Building a Fence on a Hill
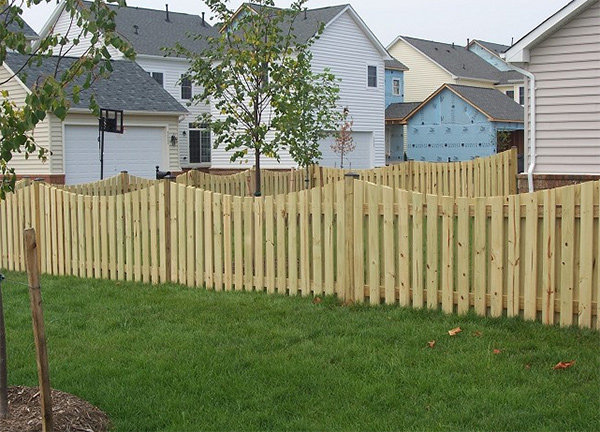
If you do have a hill that you must build your fence on, all is not lost. There are a couple of options you can use here. One is to use a stepped fence, which will leave some space below the fence panels that you will need to potentially cover depending on the reason you are building a fence. The other is to build your fence so that it moves along the hills and slopes. This will require custom cut fence posts, but it will keep your fence tight to the ground so there will be no gaps beneath it. It all depends upon what the ultimate goal of your fence is going to be.
-
Tip #6: Determine Your Gate Style
A fence isn't complete without a gate. But you can't just put any gate on any fence. To really make your fence look amazing, you must match the gate to the style of fence. If you are looking for a privacy fence, a iron rod gate probably isn't going to do the trick. Just be sure that your gate matches the style and purpose of your fence.
-
Tip #7: Techniques of Staining a Fence
When it comes to staining your fence, be sure that you inspect it for anything that may need to be removed, such as nails, staples, etc. Then prep your fence by sanding any rough spots smooth. Once your fence is prepped, you can now apply a good wood stain to help protect your fence. Once the stain is applied, give you fence 24-48 hours to rest.
After you have finished all of the above steps, taken the tips and considerations into thought, just sit back and enjoy all of your hard work. You have just built a fence from beginning to end. Congratulations and go enjoy your fence.
